
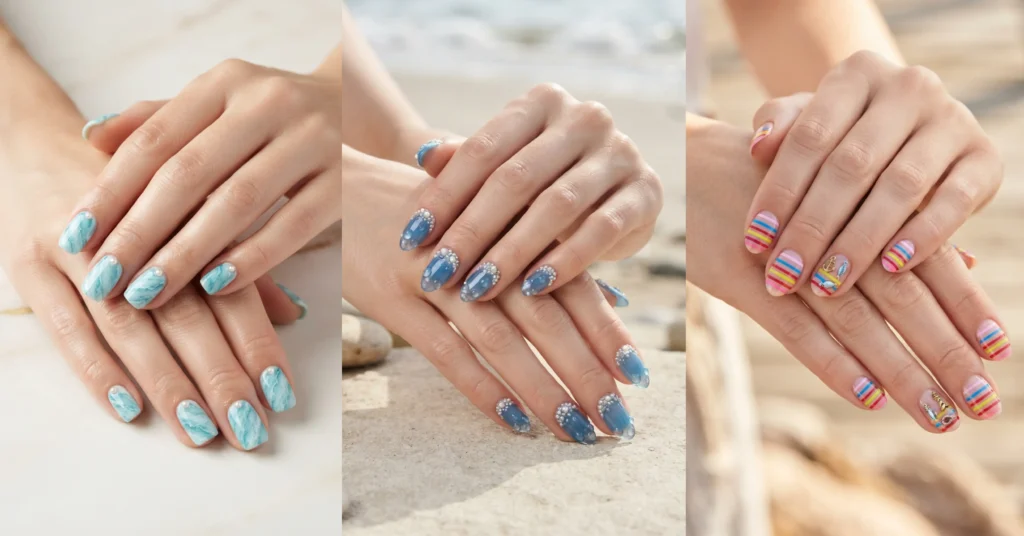
There’s a specific kind of magic in the days right before a beach trip. Your swimsuits are folded on the bed, your playlist is queued, and the last thing to sort is the manicure – the one that’s going to show up in every group selfie, poolside cocktail photo, and hand-in-the-water shot from the boat. And if you’re anything like me, “cute and quiet” isn’t going to cut it. You want something loud, playful, and unmistakably vacation-coded.
So I went through the 2026 funky beach nail trends, tested a few myself, and put together 12 designs that actually earn their place on your fingertips this summer. Some are wild, some are dreamy, some are pure boardwalk energy – all of them are meant to be seen. Feel free to skip around and pick your favorite.
What Are Funky Beach Nails?
Funky beach nails are bold, playful, statement manicures inspired by coastal aesthetics – think mismatched color combos, 3D shells and pearls, chrome and iridescent finishes, ocean textures, and tropical color palettes rather than a simple polish. The word funky separates them from the softer coastal categories like clean girl or minimalist. Funky beach nails are the ones that photograph loudly, get compliments in the elevator on the way to the pool, and look intentional in every vacation selfie.
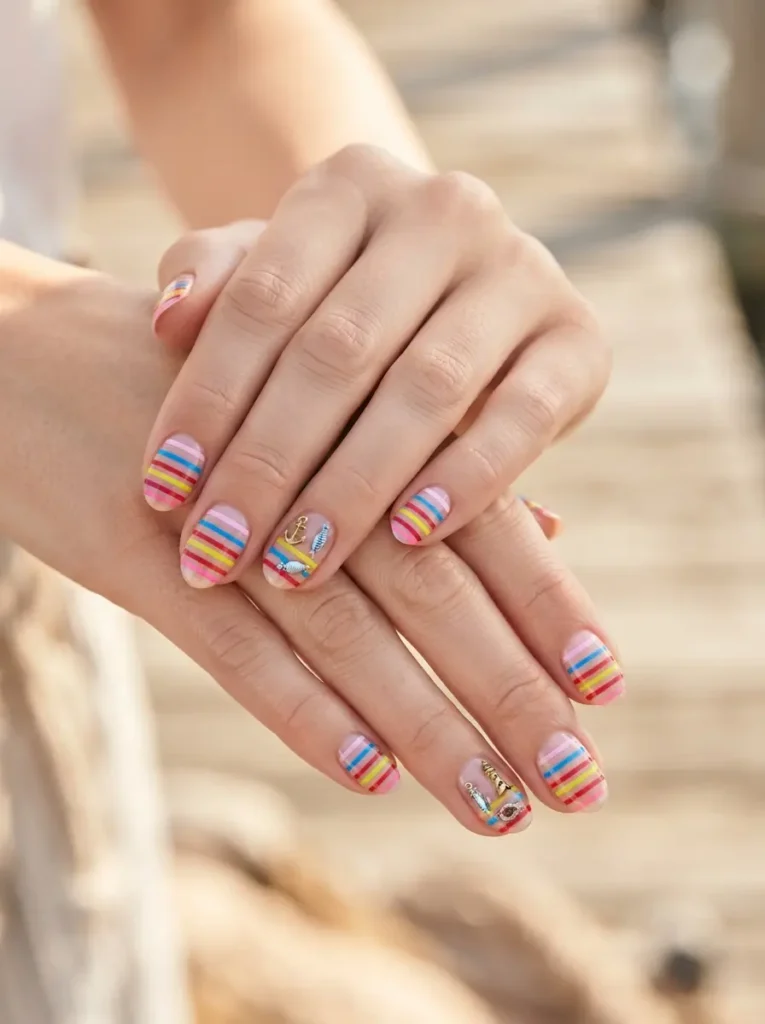
1. Fisherman Core Rainbow Stripes
Fisherman-core rainbow stripe nails feature colorful thin stripes across each nail – pink, blue, yellow, red, lime – with tiny nautical charms or lure decals on one accent nail.
Best for: boardwalk energy and any beach town trip.
Difficulty: medium.
Tools: five bright polish colors, thin nail art brush or striping tape, tiny buoy or fish-lure decals.
Fisherman-core is one of the wildest trends of the year, and it works beautifully on nails because the mismatched stripes translate directly. Keep the stripe count to two or three per nail – five stripes crosses into cluttered fast. This is the design that gets the most “wait, let me see” reactions.
2. Pearl-Crusted Tide Pool Nails
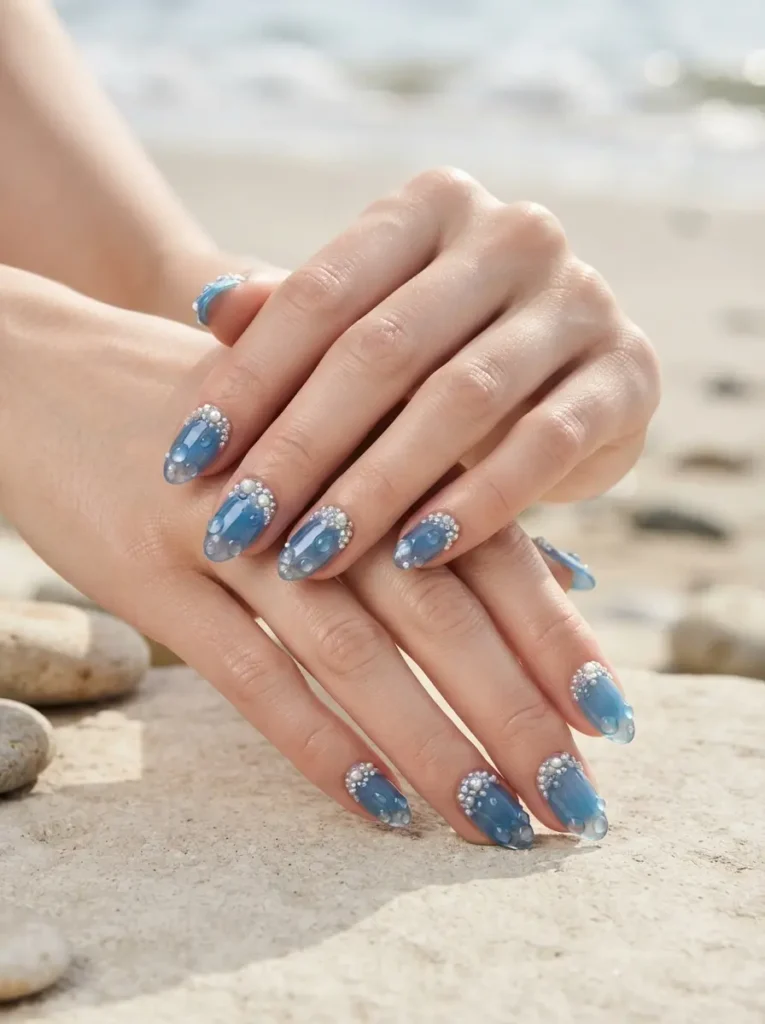
Pearl-crusted tide pool nails combine a sheer glassy blue jelly base with a slight 3D water-droplet effect built up on the tips and tiny micro-pearls placed around the cuticle.
Best for: grown-up mermaid vibes and photography-heavy trips.
Difficulty: hard.
Tools: clear builder gel, sheer blue jelly polish, micro-pearl gems, rhinestone dotting tool.
This one is a gorgeous grown-up take on classic mermaid nails. Build the 3D water effect with clear builder gel on the tips, then place the micro-pearls around the cuticle in a scattered, unfussy pattern. Best on almond or oval shapes with a little length – the pearls need room to breathe.
3. Iridescent Mermaid French Nails
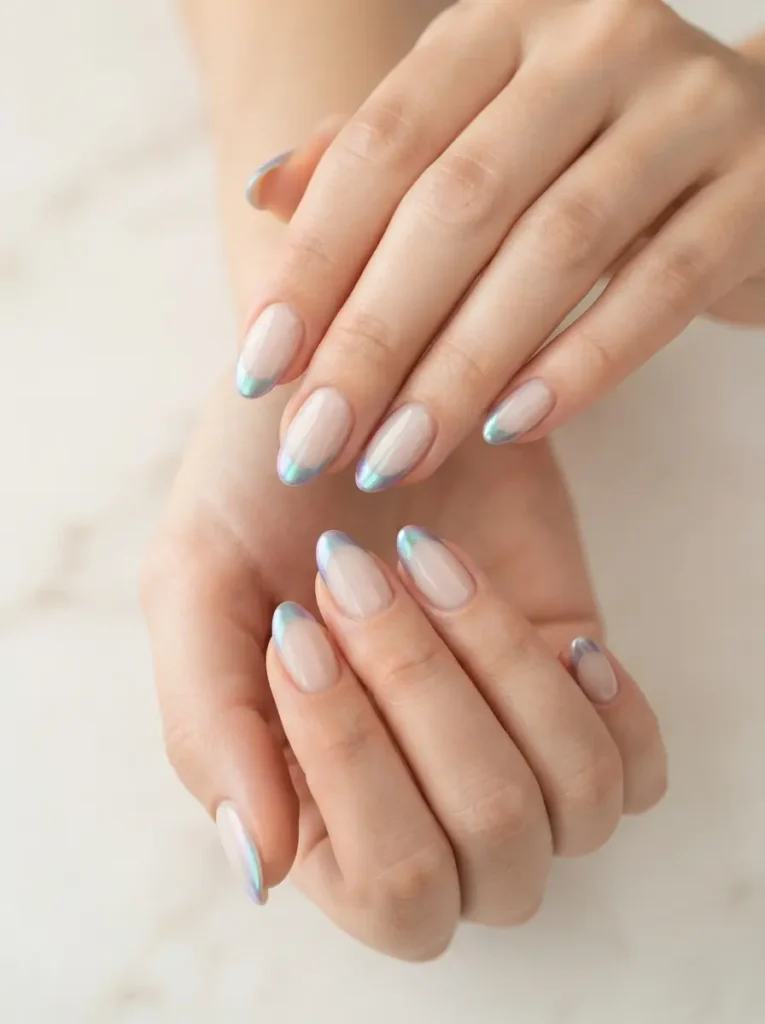
Iridescent mermaid French nails pair a pale nude or clear base with a chrome-shift tip that moves from teal to lavender to pink depending on the light.
Best for: dreamy editorial vibes and evening dinners.
Difficulty: medium.
Tools: nude gel base, gel top coat, teal-to-lavender iridescent chrome powder, soft eyeshadow-style brush.
The chrome shift is the whole point. Apply the powder over gel top coat while it’s still tacky and buff it in gently with the eyeshadow brush – that layering method is what makes the color shift look editorial rather than kiddie-glitter. Photographs incredibly on all skin tones.
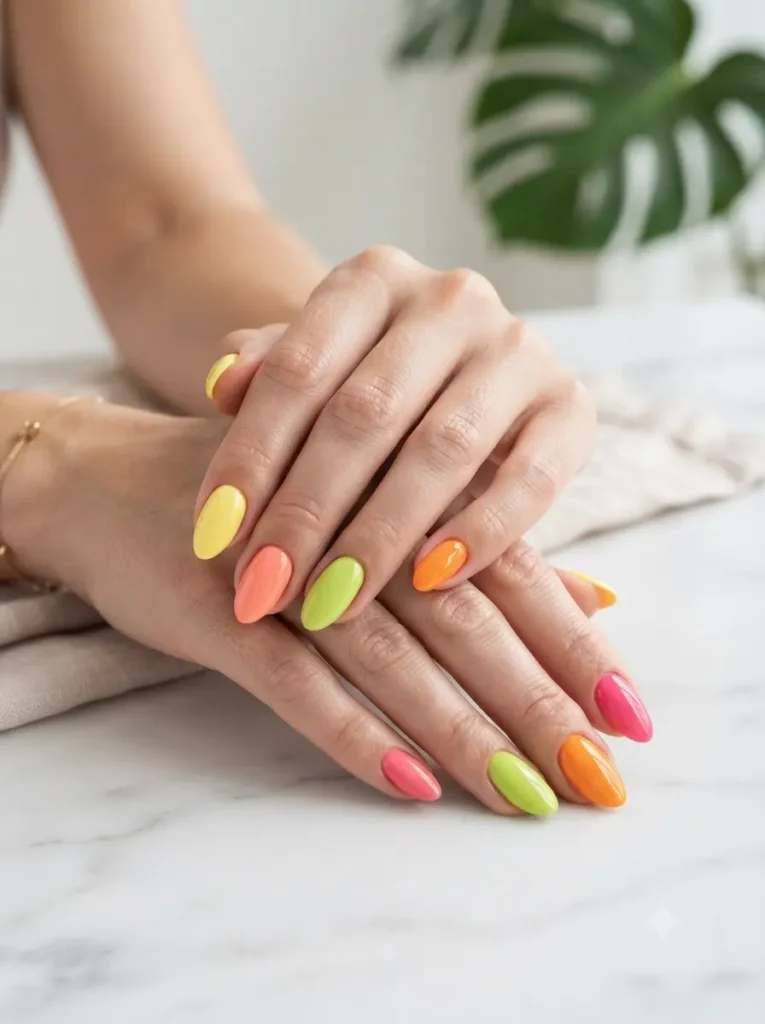
4. Mismatched Tropical Citrus Nails
Mismatched tropical citrus nails feature each nail in a different bright tropical color – lemon on the thumb, coral on the index, lime on the middle, tangerine on the ring, hot pink on the pinky.
Best for: the easiest funky look to DIY.
Difficulty: easy.
Tools: five bright tropical polishes, sticky base coat, glossy top coat.
Use a glossy top coat only, not matte – the shine is what makes bright colors read as fun rather than childish. This is the trend that reads as pure vacation energy and pairs with everything from swimsuits to breezy dinner dresses. Genuinely the easiest funky style on this list.
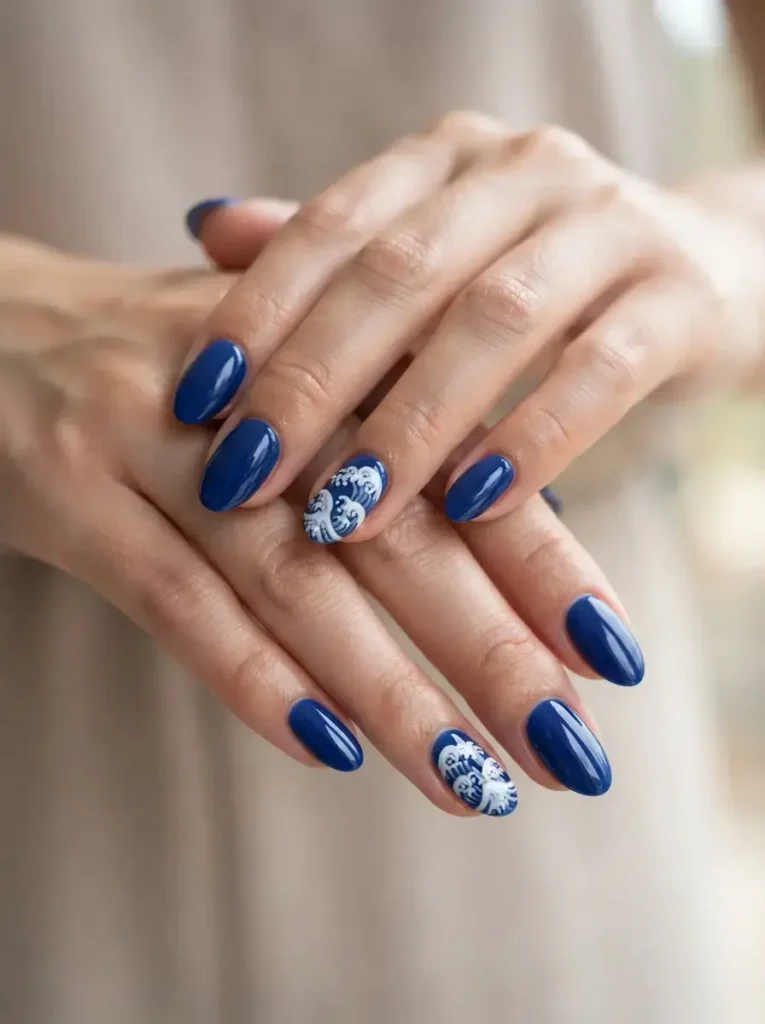
5. Hokusai Wave and Foam Nails
Hokusai wave-and-foam nails use a deep royal blue base with hand-painted white foam curls on two or three accent nails, inspired by classic Japanese wave art.
Best for: longer nails and art-appreciator vibes.
Difficulty: hard.
Tools: royal blue gel polish, white polish, very thin nail art brush, gel top coat.
This is the most artistic direction on this list. The bold curves and white foam details demand a steady hand or a nail tech who does hand-painted art – decals work but rarely hit the same as painted. Best on almond or coffin shapes with some length so the wave has room to move.
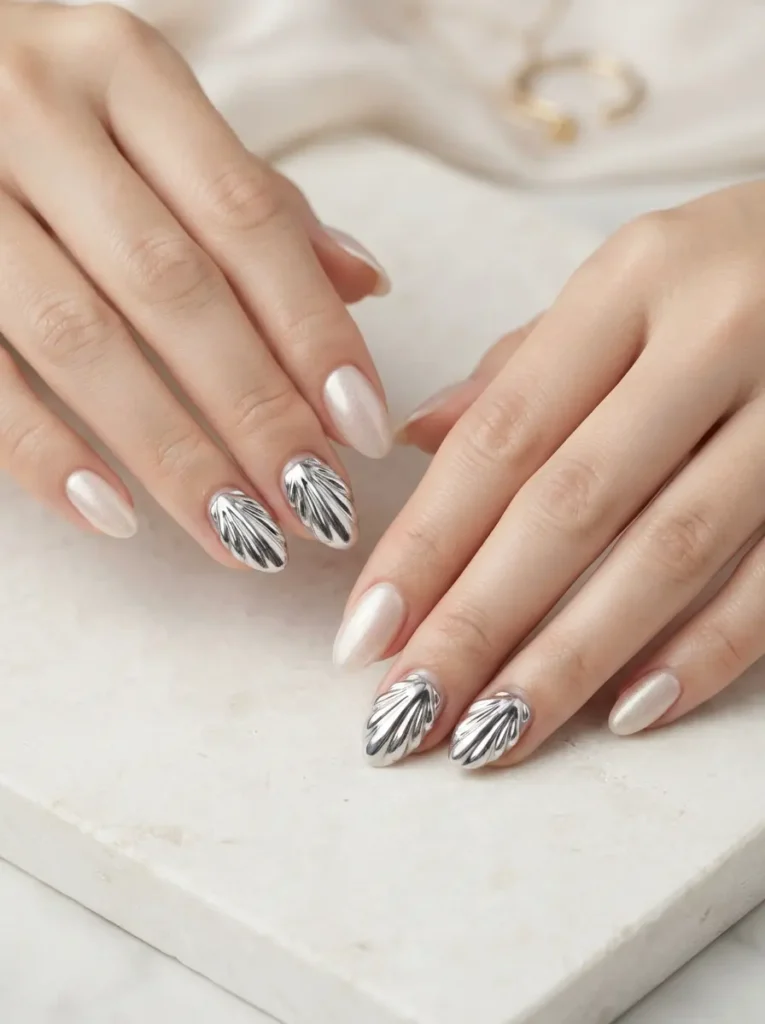
6. Chrome Shell 3D Tips Nails
Chrome shell 3D tip nails feature sculpted 3D seashell shapes at the tips of two or three nails with chrome finish, over a plain shimmery base on the rest.
Best for: cruises and destination trips where you want maximum drama.
Difficulty: hard.
Tools: sculpting gel, shell-shape silicone mold or freehand skill, chrome powder, gel top coat.
The sculpted shells are the showpiece – keep the other nails simple so the shells stand out. This design is best done at a salon unless you have serious nail art experience, but the result is unmistakably editorial. Pair with almond or coffin shapes for the right proportion.
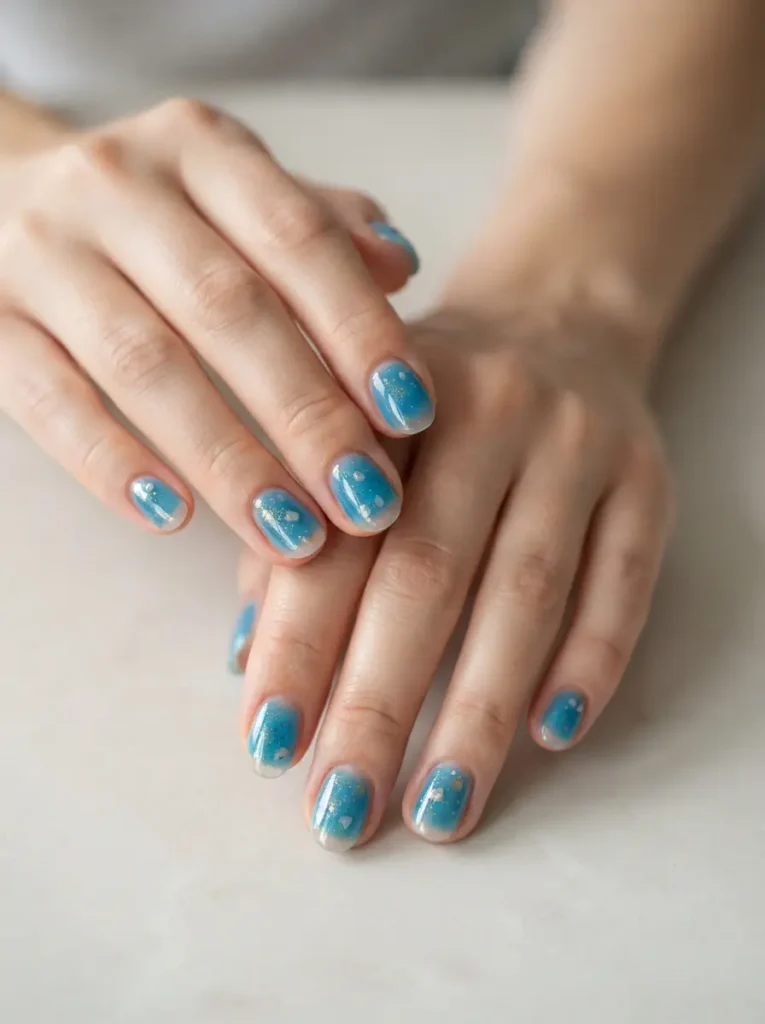
7. Jelly Ocean Blue Nails
Jelly ocean blue nails apply a sheer, glossy blue jelly polish that lets natural nail show through, with a hint of gold shimmer or tiny crushed shell flecks scattered inside.
Best for: a funky-lite option that stays wearable.
Difficulty: easy.
Tools: sheer blue jelly polish, gold shimmer polish or crushed shell flecks, glossy top coat.
Jelly finishes are one of the biggest nail stories of the year, and the ocean blue version is the most beach-appropriate. Keep the base translucent – one thin coat, then the shimmer scattered lightly, then a heavy glossy top coat to give it that candy jelly bounce. Genuinely easy to DIY.
8. Sunset Gradient Nails
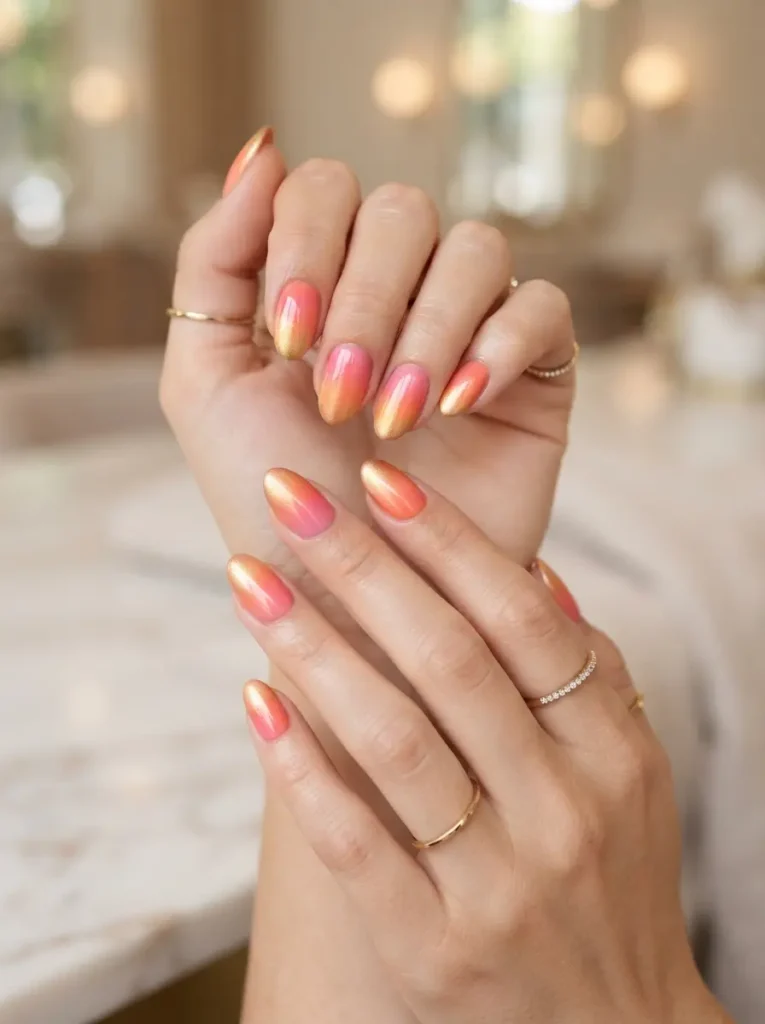
Sunset gradient nails blend warm coral into pink into orange into gold across each nail, using a sponge dab technique to create the soft transition.
Best for: golden hour photos and warm-toned vibes.
Difficulty: medium.
Tools: coral, pink, orange, and gold polishes, dense makeup sponge, glossy top coat.
Sponge the colors on rather than trying to paint the gradient with a brush – the sponge is what makes the transitions look soft and blended rather than streaky. This palette is romantic without being sweet, and it photographs incredibly during sunset dinners.
9. Neon Coral with Gold Flecks Nails
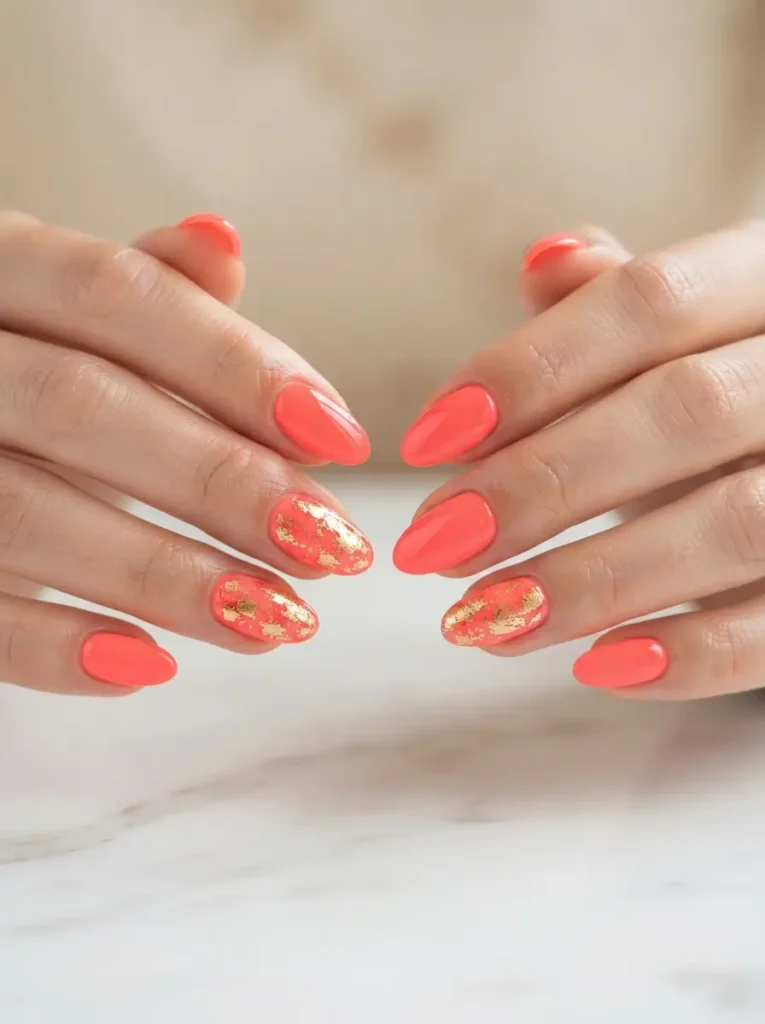
Neon coral with gold flecks nails use a bright neon coral polish on all ten nails, with a scattered gold foil detail on two accent nails for texture.
Best for: tan skin and daytime beach energy.
Difficulty: easy.
Tools: neon coral gel polish, gold foil flakes, tweezers, gel top coat.
Neon coral against a summer tan is one of the most flattering color combinations there is. The gold foil accents keep it from feeling flat — scatter them casually with tweezers rather than placing them precisely, so the look stays organic and beachy. Skip matte top coat here; gloss is the point.
10. Holographic Aqua Chrome Nails
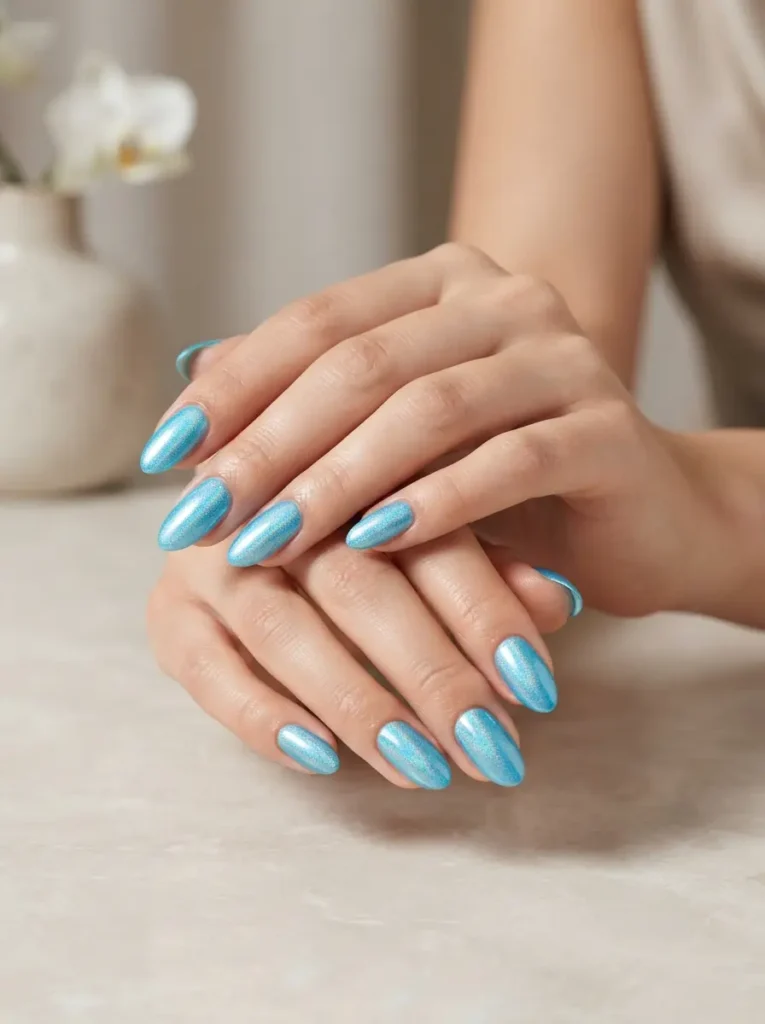
Holographic aqua chrome nails apply a bright aqua base with a holographic chrome overlay that catches rainbow flecks in the sun.
Best for: poolside photos and afternoon light.
Difficulty: medium.
Tools: aqua gel polish, holographic chrome powder, gel top coat, buffing brush.
Holographic chrome shifts differently depending on light angle, which is exactly what makes it magic in outdoor sunlight. Apply the aqua as your base color, cure, then buff the holographic powder over a fresh layer of tacky gel top coat. Seal with another top coat to lock the shift in.
11. Mismatched Sea Life Nails
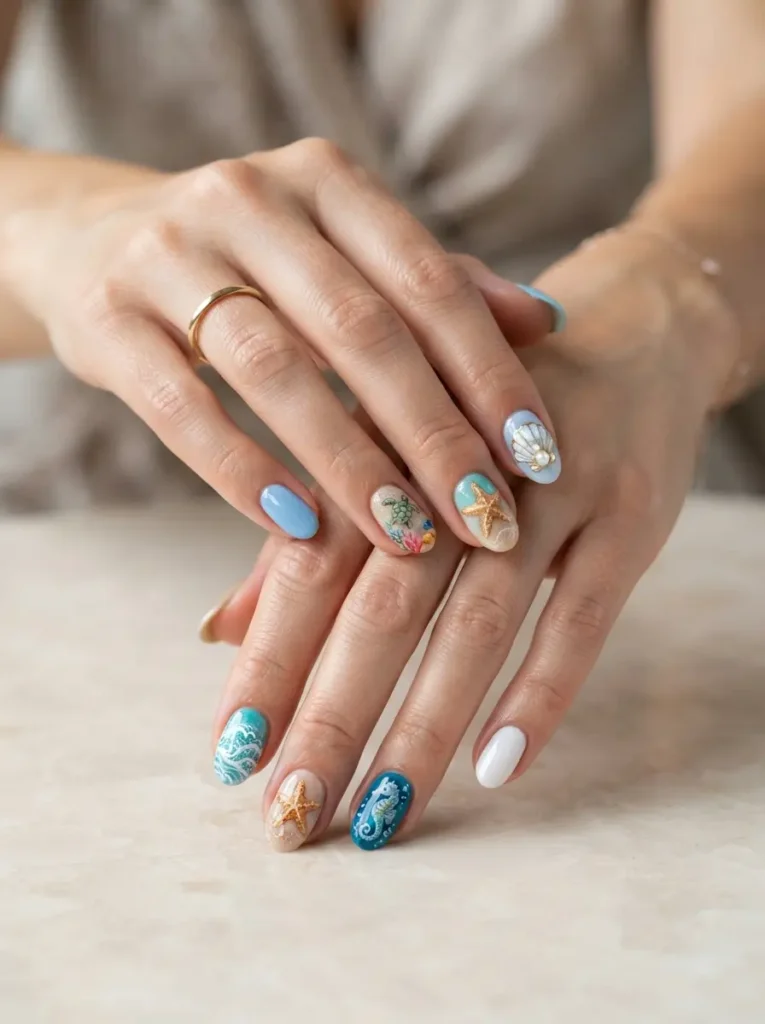
Mismatched sea life nails feature each finger with a different ocean creature – one nail with a starfish, another with a seahorse, another with waves, another with a shell, another with plain polish.
Best for: playful vacation energy and creative expression.
Difficulty: hard.
Tools: nude or sheer blue base, sea-life decals or hand-painted art, thin nail brush, top coat.
Decals from a nail supply store are the way to go here unless you’re a nail artist – hand-painted sea life on this scale is genuinely hard. Keep the base color consistent (sheer sand-beige or seafoam) so the mismatched art has something to unify it, otherwise the whole hand looks confused.
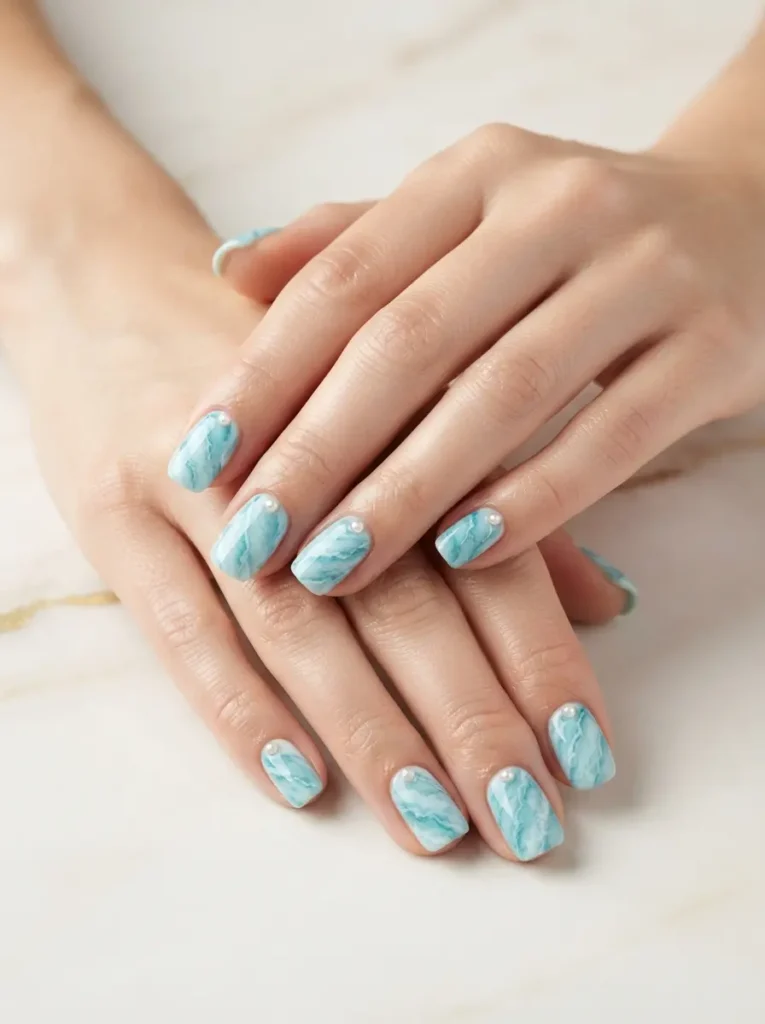
12. Turquoise Marble with Pearls Nails
Turquoise marble with pearl nails use a swirled turquoise, white, and pale blue marble effect across all nails, with a single micro-pearl placed at the cuticle of each nail.
Best for: editorial-feeling vacation nails.
Difficulty: medium.
Tools: turquoise, white, and pale blue polish, sponge or nail art brush, micro-pearl gems, gel top coat.
The marble swirl looks like moving water, and the single pearl at the cuticle of each nail is what elevates it from “pretty” to “considered.” Do the marble by dabbing polish onto plastic wrap and pressing it onto the nail – that technique creates the softest, most water-like transitions.
How to Beach-Proof Your Funky Nails
Funky designs are more vulnerable than plain polish because every raised detail – chrome, 3D, glitter, decals – is a potential lift point. Here’s the routine.
- Choose gel or dip, not regular polish. Gel resists chipping in salt water for around two weeks; regular polish struggles past four days.
- Cap every edge at application. The most common failure point is the free edge of the nail – ask your tech to seal the tip with base, color, and top coat.
- Apply a fresh top coat every morning before the beach. A thin layer of clear top coat reseals the design and adds real days to the lifespan.
- Rinse hands with fresh water after every ocean swim. Salt residue is what starts the lifting process.
- Apply sunscreen with palms, not fingertips. Some sunscreens contain chemicals that can weaken or discolor nail polish.
- Cuticle oil every single night. Salt water pulls moisture out of skin and nails – this is the difference between healthy vacation nails and brittle ones.
How to Remove Beach Nails Without Wrecking Them
For regular polish, use an acetone-based remover and cotton pads – soak, press, wait ten seconds, wipe. For gel or dip, soak cotton pads in acetone, wrap each fingertip in foil, and wait fifteen minutes before gently pushing the softened polish off with an orange stick. For press-ons, soak your fingers in warm soapy water with a little oil for a few minutes, then wiggle each one off gently. Never pry – prying takes layers of your natural nail with it. Follow every removal with hand cream and cuticle oil, and give your nails a day or two before your next set.
Common Funky Beach Nail Mistakes to Avoid
- Booking the day before travel. Fresh polish is soft polish – chips fast when it hits sand and sunscreen on day one. Do it 2–3 days early for gel; 1–2 days for regular polish.
- Using regular polish for a bold design. Chrome, 3D, and decal designs need gel or dip to hold – regular polish loses raised details within a day.
- Applying sunscreen directly to fingertips. SPF residue seeps into the polish edge and starts lifting. Rub SPF in with your palms.
- Long stays in salt water. Twenty minutes is fine; two hours daily for a week absolutely wrecks polish.
- Picking at chips. Picking rips a chip into a full lift and damages the nail underneath.
Pingback: 15 Lollapalooza Nail Ideas That Survive Four Days of Festival - TheZelovo.com